Documentation
Nexaq - SEO Digital Marketing Agency WordPress Theme
Thank you for purchasing our theme, now you are an owner of a regular license or extended license of Nexaq WordPress Theme. You are entitled to get free lifetime updates to this product + exceptional support from the author directly.
This documentation is to help you regarding each step of customization. Please go through the documentation carefully to understand how this Theme is made and how to edit this properly. You may learn basics here.
Nexaq is WordPress Theme for multipurpose using for purposes of SEO Marketing & Digital Marketing Agencies. This theme can be used as a Marketing Agency, SEO Service, Social Media Marketing and Consulting, AI Software Presentation also. This theme has 6 different Home pages including 35+ inner pages which are designed with new ideas and innovative presentations with the help of the latest features which can attract visitors easily. This theme has made with Elementor Page Builder so that it can easily edit by drag and drop. It is compatible with all browsers and fully responsive so very suitable for any device.
- Item Name: Nexaq - SEO Digital Marketing Agency WordPress Theme
- Author: EgensLab
- Created: 09 December, 2024
- Version: 1.0.0
If you have any questions that are beyond the scope of this help file, Please feel free to email via Item Support Page.
Getting Started
To install this theme you must have a working version of WordPress already installed.
- For information in regard to installing the WordPress Platform, please see the WordPress Codex: Installing WordPress
- Before to start working with your new theme, make sure that your WordPress Version is updated to the latest one.
- You can know more about WordPress Requirements from here.
Server Requirements
Please make sure you have fullfilled the following Requirements
- WordPress 5.8 or higher version.
- PHP Version 7.4.0 or Upper . ( 8.0 recommended )
- MySQL 5.6 or greater.
It is also recommended to setup your php limit to avoid the common issues during the plugin installation and demo import.
- memory_limit 128M
- max_execution_time 180
- post_max_size 64M
- upload_max_filesize 64M
- max_input_time = 120
- max_input_vars = 10000
Knowledge Base
Firstly you need to install WordPress on your server using softaculas or other installer. It depends on your hosting provider.
Here are some usefull links to get started with WordPress:
- Official instruction of installing WordPress on your server- WordPress Installation
- Here is the official guide to get started with WordPress- Getting Started
What's Included in the zip folder
- A zip file of the theme .
- A plugin zip file for core functionality.
Installation
Follow the steps below to setup your WordPress theme.
There are two methods to install the Nexaq WordPress Theme. The first one is using the WordPress Theme Installer and the second is installing it using the FTP method.
After Importing the demo file, you need to save theme option two times.
WordPress Theme Installer
- Login into the WordPress Dashboard and search for Appearance -> Themes.
- Click "Add New" at the top of the page.
- Now click on "Upload Theme".
- Choose the zip file you will find within the whole package you downloaded from Themeforest -> "Nexaq.zip"
- Once the installation is complete you can Activate the Nexaq WordPress Theme
FTP Upload Method
- Using your FTP client, login to your server via FTP and navigate to "wp-content/themes" under your website's root directory.
- Here you must place the main folder you will find within the whole package you downloaded from Themeforest, this folder called "Nexaq" ( unzipped version ).
- Once your files are completely uploaded to your server, log into the WordPress Dashboard and go to "Appearance -> Themes" .
- Search the Nexaq WordPress Theme Screenshot and click to "Activate".
Theme Installation Tutorial
Screenshot Of whole Process to Install Theme
Choose the zip file what you will find within the whole package you downloaded from Themeforest -> "Nexaq.zip"
.png)
Now, Click Activate to activate the theme
.png)
Plugin Installation
When the theme is uploaded You need to install some recommended plugins.
Click Begin Installing Plugin.
.png)
Now, Select all the plugin to install
.png)
Now, Select Install then Click Apply button
.png)
After installing all plugins Click Return to Required Plugins Installer
.png)
Now, Select Activate then Click Apply for activating all plugins
.png)
One Click Demo Import
You can easily import demo data using our one-click demo content importer. View our screenshot to the demo import page.
Set Front Page and Posts Page
You can easily import demo data using our one-click demo content importer. View our screenshot to import demo data in your WordPress site
.png)
Now Click Import Demo Data
.png)
Now, Click Continue & Import
.png)
Congrats! Your site is ready..
After import completed successfully, click visit site
.png)
Changing Logo & Page Title
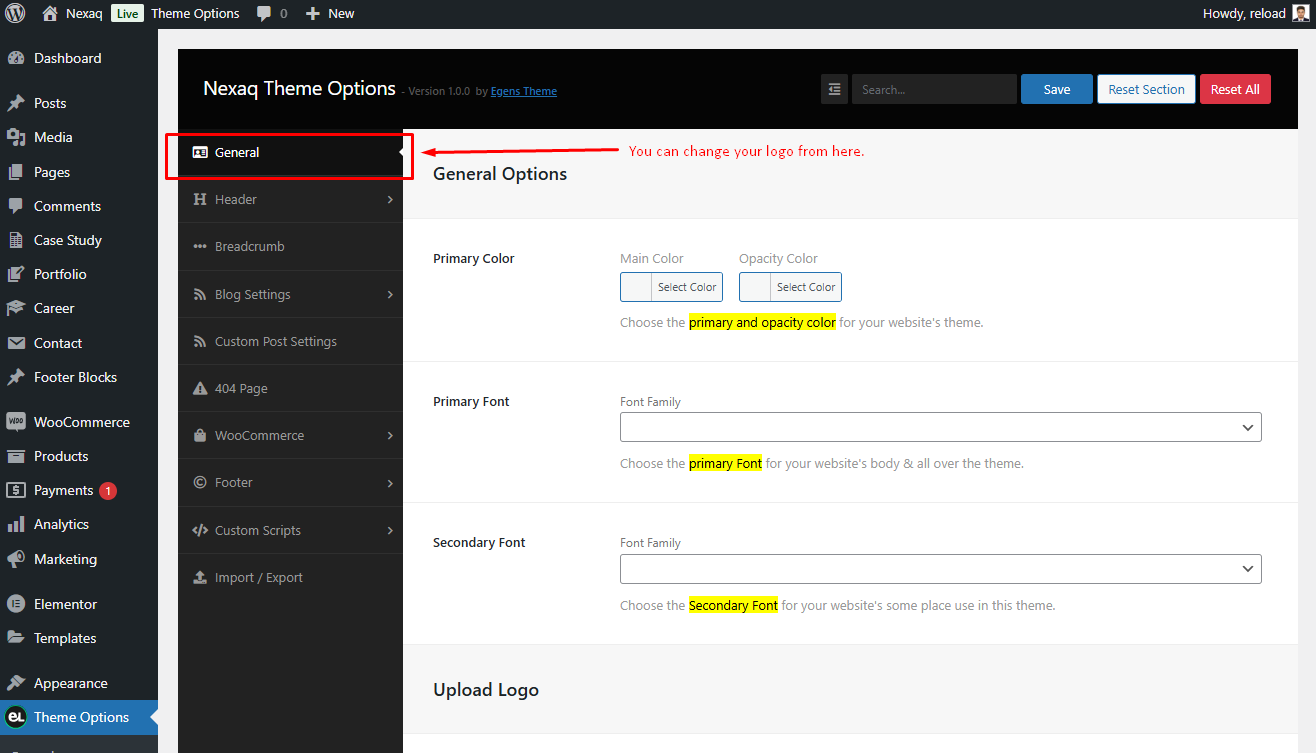
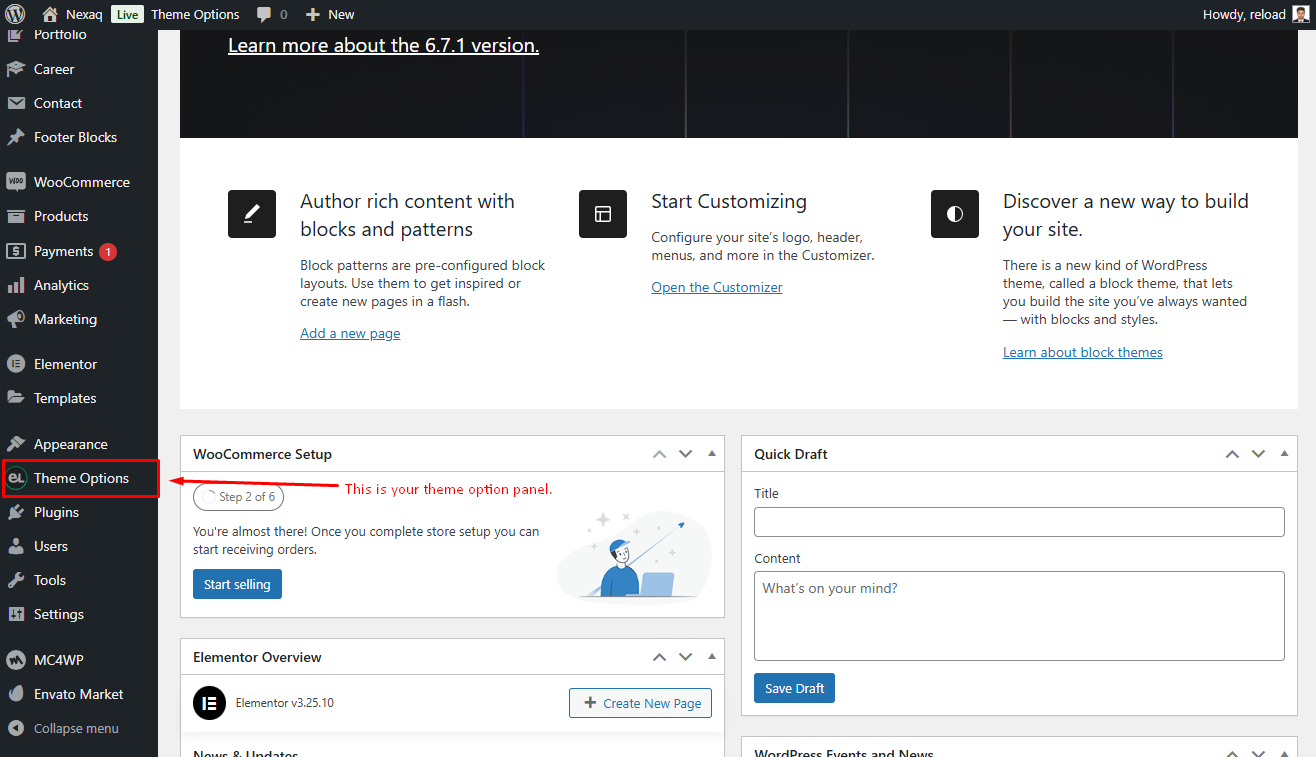
You can manage some special Settings from Nexaq theme customizer easily. And the other Settings will be found in the theme option panel.
You can change your Theme Logo from theme options panel
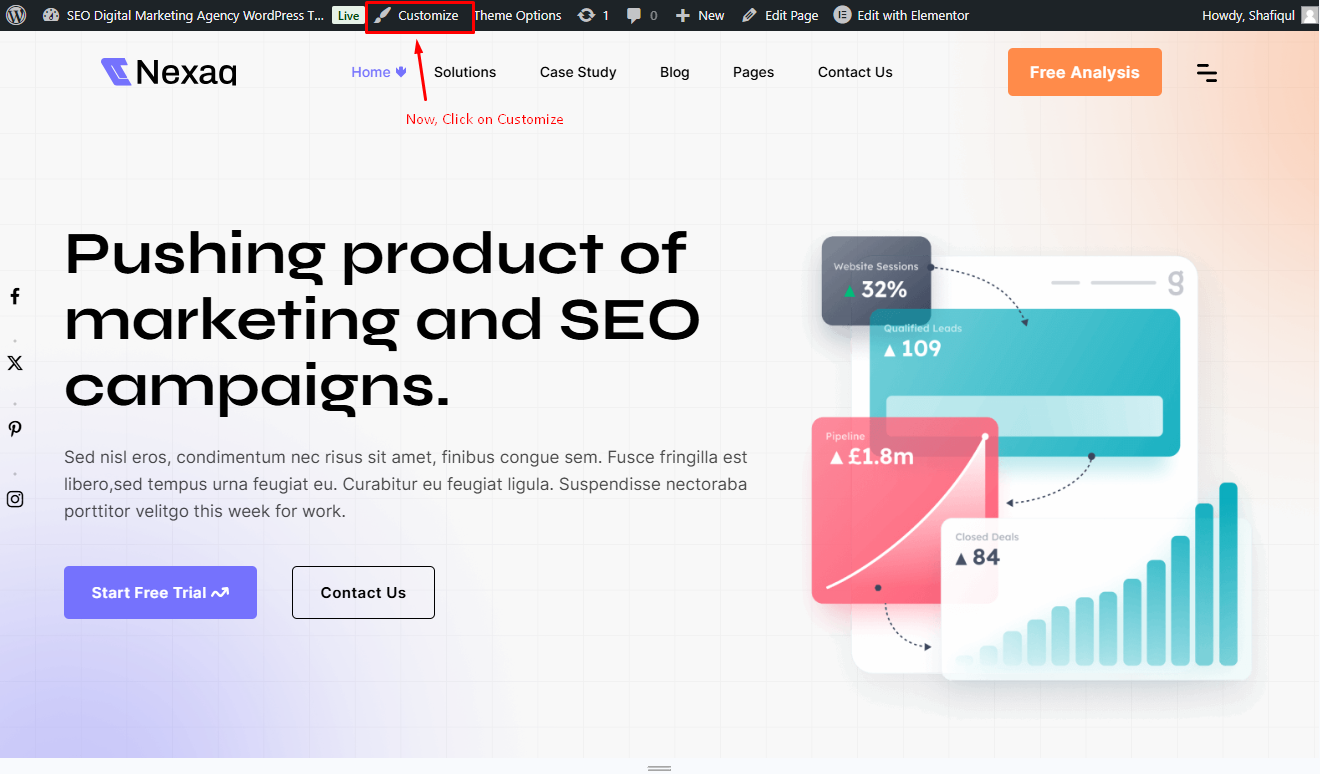
Now, Click on Customize for other options
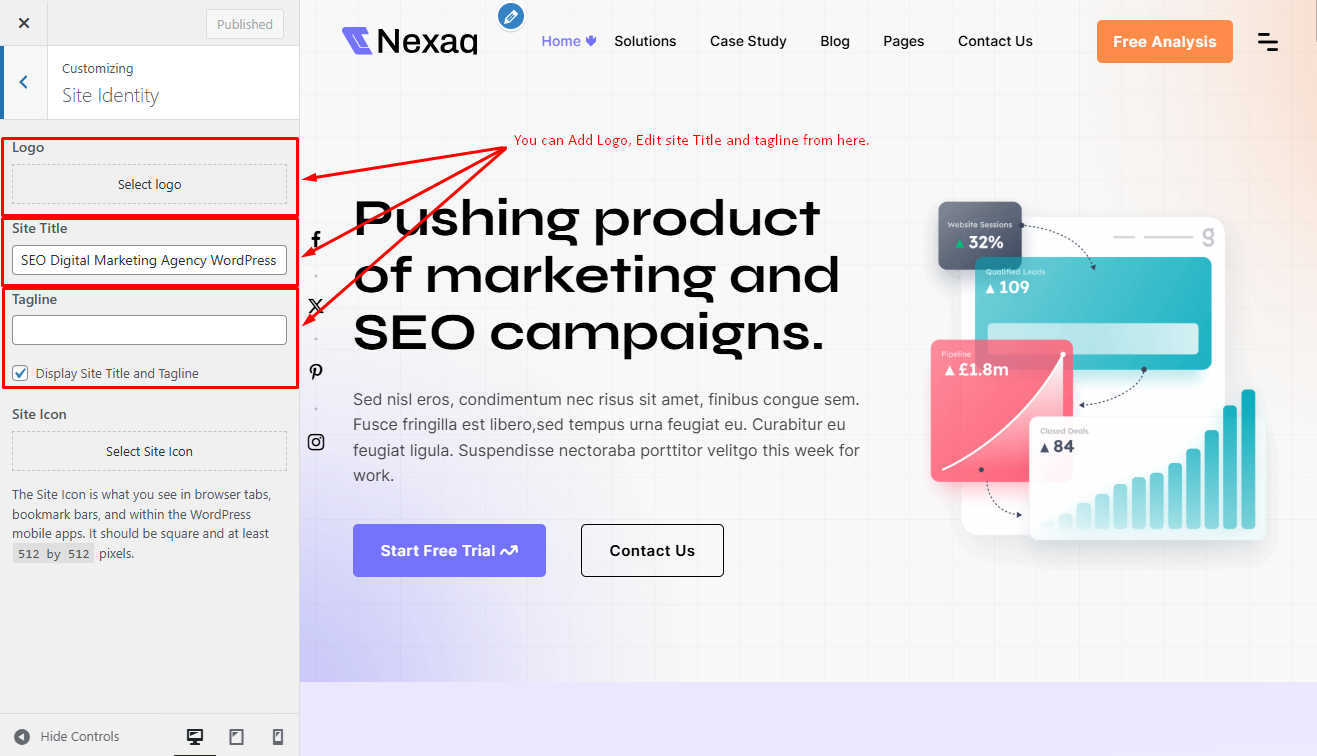
These options are for Theme Logo, Site Title and Tagline.
Setting up the Menu
The final step before you can start with the new theme is to create your menu, it will be really easy. If you import our demo data it will automatically make a menu for you and set it a primary location.
Let's make your own menu.
Go to "Appearance -> Menus" and you will see a panel where you can create new menus. Create one, add your created pages to it and save it. After this in "Menu Settings" below the menu select"Header Menu" and hit "Save Menu".
For One Page Menu you need to use custom links option to make one page menu. Put your section ID in the URL field and menu text goes Link Text field. Then hit Add to Menu Button.
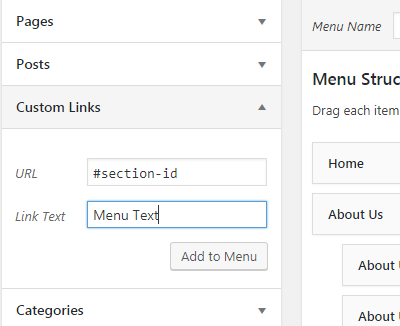
Note: You can use up to two levels of navigation in this theme.
The Customizar
After activating the theme, you will notice that a new submenu item appeared, under "Appearance -> Customize".
If you click on it you will be taken to the WordPress customizer, a tool which will allow you to modify the look and feel of your website.
Unfortunately not all theme options features are present. You can select only the body background color, background image, custom header image, logo & favicon.
Set Homepage and Blogs
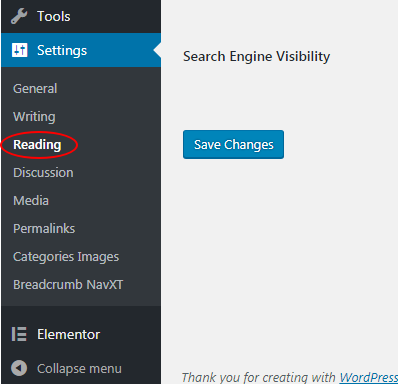
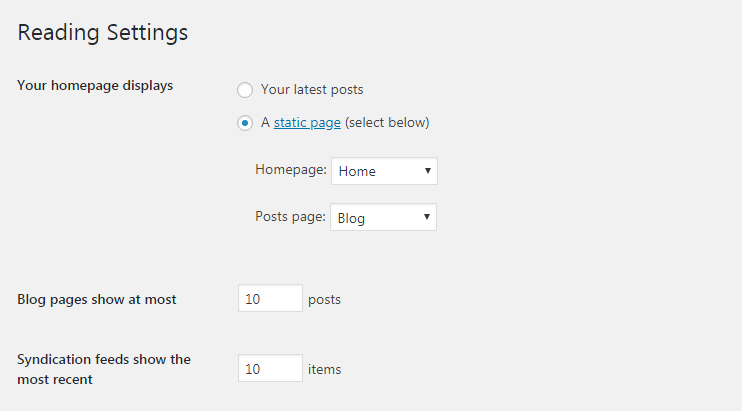
- Login to WordPress admin panel (URL should be
www.yourdomain.com/wp-admin) - Navigate to
"Settings > Reading". - From dropdown, select which page you want to set as
"Front Page"and which page you want as“blog posts”page. Default Front Page is‘Home’and default posts page is‘Blog’.. - Click on ‘Save Changes’ button to save all.
Creating A New Page
Step 1: Navigate the Add New menu under the Pages Navigation.
Step 2: Select your header style and Give it a title.
Step 3: Use Elementor for your page Customization.
Elementor Page Builder
Now you can customize the page with elementor page builder.
Contact Form 7
Contact form 7 is used to create ‘easy to handle’ and ‘easy to customize’ forms. Nexaq theme has a pre-built forms. To get all forms, ‘Contact Form 7’ plugin must be installed and activated. You can add/edit/delete the contact form by following this documentation
https://contactform7.com/getting-started-with-contact-form-7/
Contact Form 1
<label> Your name
[text* your-name autocomplete:name] </label>

<label> Your email
[email* your-email autocomplete:email] </label>

<label> Subject
[text* your-subject] </label>

<label> Your message (optional)
[textarea your-message] </label>

[submit "Submit"]
Contact Form 2
<div class="row">
<div class="col-md-12 mb-35">
    <div class="form-inner">
        <label>Full Name *</label>
        [text* text-225]
    </div>
</div>
<div class="col-md-6 mb-35">
    <div class="form-inner">
        <label>Email *</label>
        [email* email-637]
    </div>
</div>
<div class="col-md-6 mb-35">
    <div class="form-inner">
        <label>Phone *</label>
        [text* text-313]
    </div>
</div>
<div class="col-md-6 mb-35">
    <div class="form-inner">
        <label>Company *</label>
        [text text-152]
    </div>
</div>
<div class="col-md-6 mb-35">
    <div class="form-inner">
        <label>Website *</label>
        [text text-833]
    </div>
</div>
<div class="col-md-12 mb-35">
    <div class="form-inner">
        <label>Interested In</label>
        [select select-735 "Product Design" "Web Development" "UI/UX Design"]
    </div>
</div>
<div class="col-lg-12">
    <div class="form-inner">
        <label>Message *</label>
        [textarea textarea-810]
    </div>
</div>
</div>
<div class="form-inner2">
<div class="form-check">
    [acceptance contactCheck optional class:contactCheck] I have read & accepted Terms & Conditions. [/acceptance]
</div>
</div>
[submit class:primary-btn2 "Submit Now"]
Contact Form 3
<div class="row">
<div class="col-md-6 mb-35">
    <div class="form-inner">
        <label>First Name</label>
        [text* text-550 placeholder "Daniel"]
    </div>
</div>
<div class="col-md-6 mb-35">
    <div class="form-inner">
        <label>Last Name</label>
        [text* text-426 placeholder "Scoot"]
    </div>
</div>
<div class="col-md-6 mb-35">
    <div class="form-inner">
        <label>Your Email*</label>
        [email* email-20 placeholder "infoexample@gmail.com"]
    </div>
</div>
<div class="col-md-6 mb-35">
    <div class="form-inner">
        <label>Phone Number</label>
        [text* text-463 placeholder "+920- 5566 **** ****"]
    </div>
</div>
<div class="col-md-12 mb-35">
    <div class="form-inner">
        <label>Cover Letter*</label>
        [textarea textarea-801 placeholder] Write cover letter [/textarea]
    </div>
</div>
<div class="col-md-12 mb-20">
    <div class="upload-file-area">
        <div class="upload-field-title">
            <h6>Upload PDF</h6>
        </div>
        <div class="custom-upload-field">
            <div class="upload-pdf-icon">
                <img src="https://nexaq.egenstheme.com/wp-content/uploads/2024/11/upload-pdf-icon.svg" alt="">
            </div>
            [file file-461 class:custom-upload filetypes:audio/*|video/*|image/* limit:1mb]
        </div>
    </div>
</div>
<div class="col-md-12 mb-50">
    <div class="form-check">
        [acceptance acceptance-994 optional class:contactCheck] I have read & accepted Terms & Conditions. [/acceptance]
    </div>
</div>
<div class="col-lg-12">
    <div class="form-inner">
        <button type="submit" class="primary-btn2" data-text="Submit Now">
            <span>Submit Now</span>
        </button>
    </div>
</div>
</div>
Contact Form White
  <div class="row">
  <div class="col-md-12 mb-35">
      <div class="form-inner">
          <label>Full Name *</label>
          [text* text-225]
      </div>
  </div>
  <div class="col-md-6 mb-35">
      <div class="form-inner">
          <label>Email *</label>
          [email* email-637]
      </div>
  </div>
  <div class="col-md-6 mb-35">
      <div class="form-inner">
          <label>Phone *</label>
          [text* text-313]
      </div>
  </div>
  <div class="col-md-6 mb-35">
      <div class="form-inner">
          <label>Company *</label>
          [text text-152]
      </div>
  </div>
  <div class="col-md-6 mb-35">
      <div class="form-inner">
          <label>Website *</label>
          [text text-833]
      </div>
  </div>
  <div class="col-md-12 mb-35">
      <div class="form-inner">
          <label>Interested In</label>
          [select select-735 "Product Design" "Web Development" "UI/UX Design"]
      </div>
  </div>
  <div class="col-lg-12">
      <div class="form-inner">
          <label>Message *</label>
          [textarea textarea-810]
      </div>
  </div>
</div>
<div class="form-inner2">
  <div class="form-check">
      [acceptance contactCheck optional class:contactCheck] <span style="color:#fff">I have read & accepted Terms & Conditions.</span> [/acceptance]
  </div>
</div>
[submit class:primary-btn2 "Submit Now"]
Home One Contact Form
<div class="row">
<div class="col-md-6 mb-35">
    <div class="form-inner">
        <label>Full Name</label>
        [text* text-598]
    </div>
</div>
<div class="col-md-6 mb-35">
    <div class="form-inner">
        <label>Phone Number *</label>
        [text* text-651]
    </div>
</div>
<div class="col-md-6 mb-35">
    <div class="form-inner">
        <label>Your Email *</label>
        [email* email-494]
    </div>
</div>
<div class="col-md-6 mb-45">
    <div class="form-inner">
        <label>Website *</label>
        [text text-581]
    </div>
</div>
<div class="col-lg-12">
    <div class="form-inner">
        <button class="primary-btn2" type="submit" data-text="Submit"><span>Submit</span>
        </button>
    </div>
</div>
</div>
Home Two Contact Form
    <div class="form-inner mb-35">
    <label>Your website url *</label>
    [text text-914 placeholder "www.example.com"]
</div>
<div class="form-inner">
    <label>Your email address *</label>
    [email* email-916 placeholder "example@gmail.com"]
</div>
<div class="form-inner2">
    <div class="form-check">
        [acceptance acceptance-735 optional class:contactCheck] I have read & accepted Terms & Conditions. [/acceptance]

    </div>
</div>
<button class="primary-btn2 two" data-text="Send now"><span>Send now</span></button>
Home Five Contact Form
<div class="row g-4">
<div class="col-lg-12">
    <div class="form-inner">
        [text* text-699 placeholder "Full Name"]
    </div>
</div>
<div class="col-lg-12">
    <div class="form-inner">
        [email* email-614 placeholder "Email Address"]
    </div>
</div>
<div class="col-lg-12">
    <div class="form-inner">
        [text text-171 "Subject"]
    </div>
</div>
<div class="col-lg-12">
    <div class="form-inner">
        [textarea textarea-585 placeholder] Message [/textarea]
    </div>
</div>
</div>
<button type="submit" class="primary-btn2 two" data-text="Contact Now"> <span>Contact Now</span> </button>
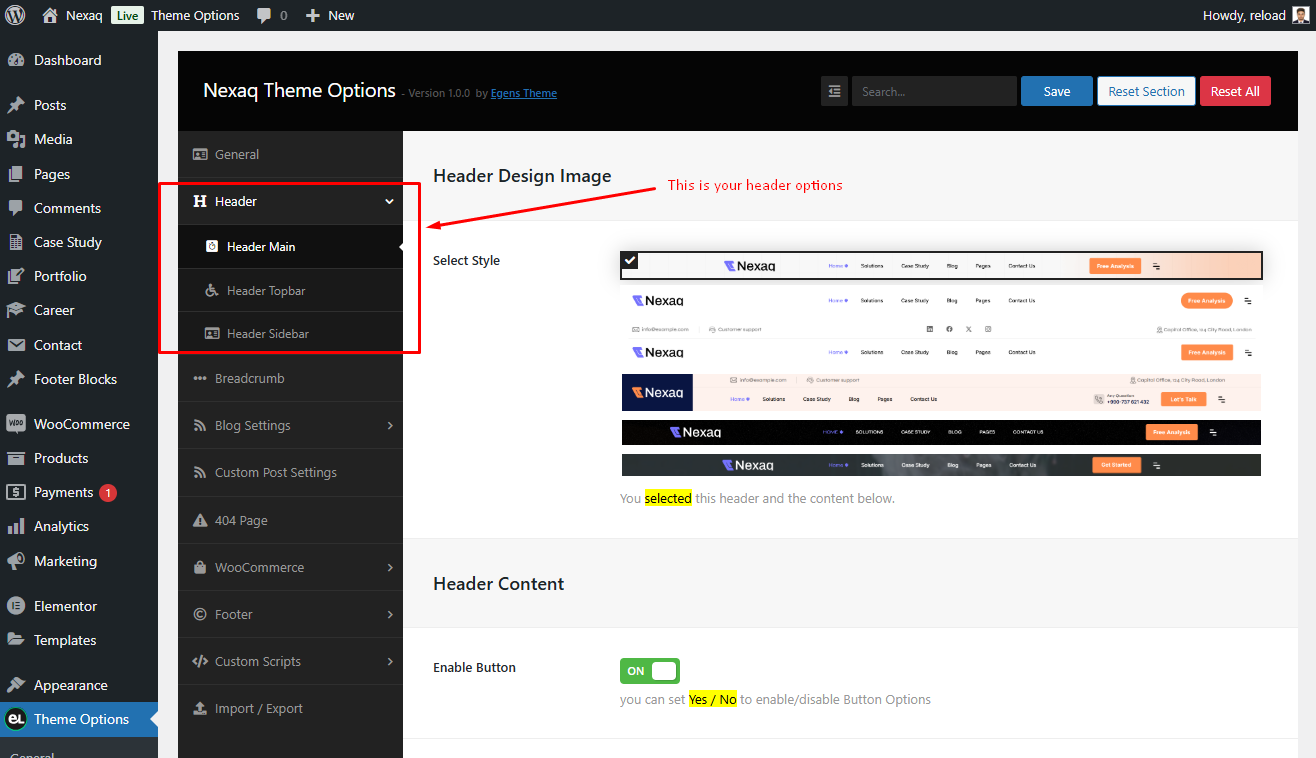
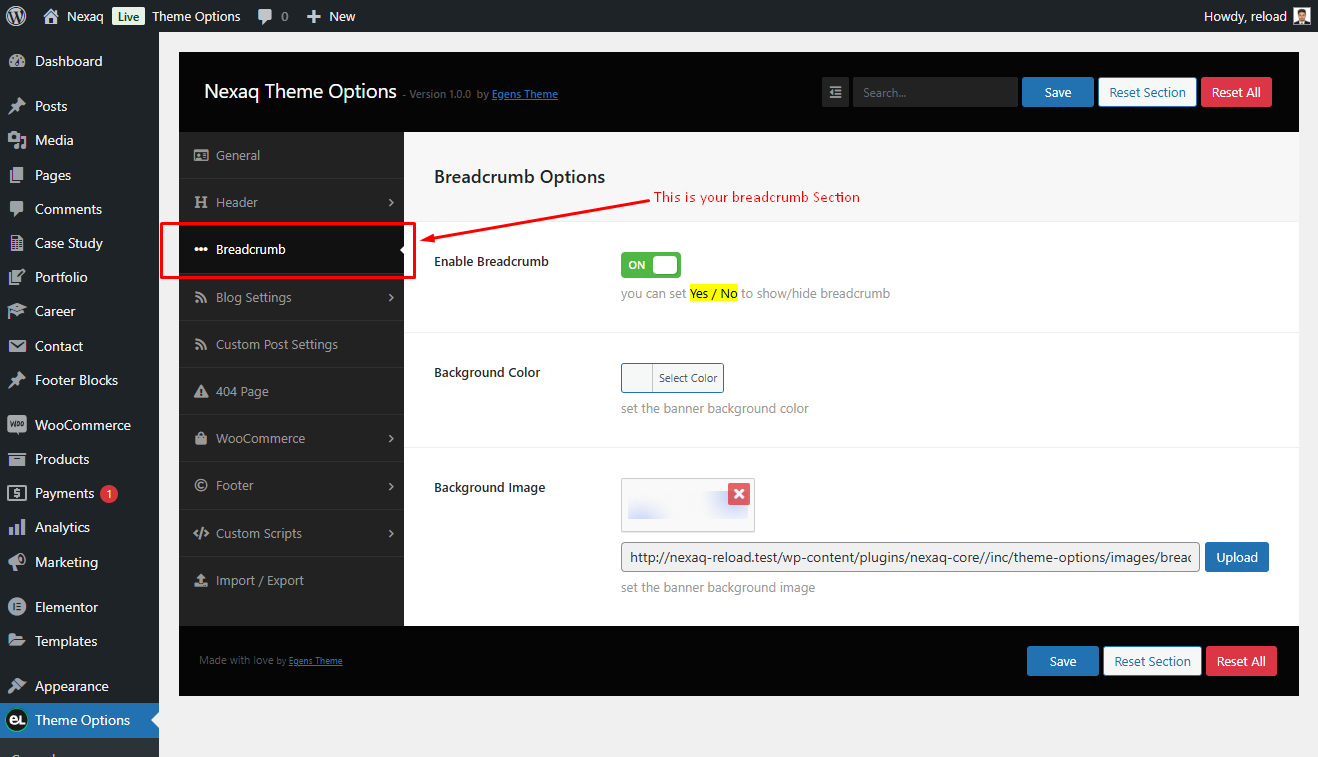
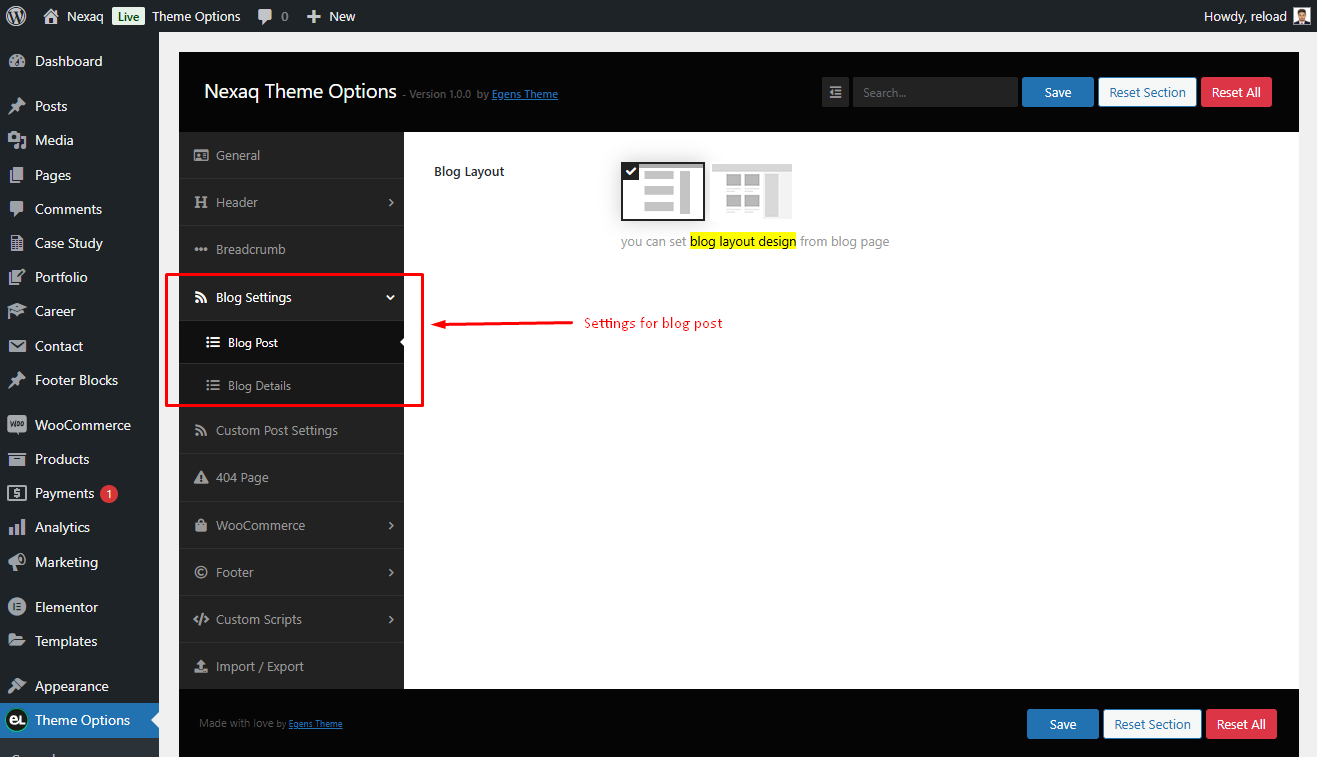
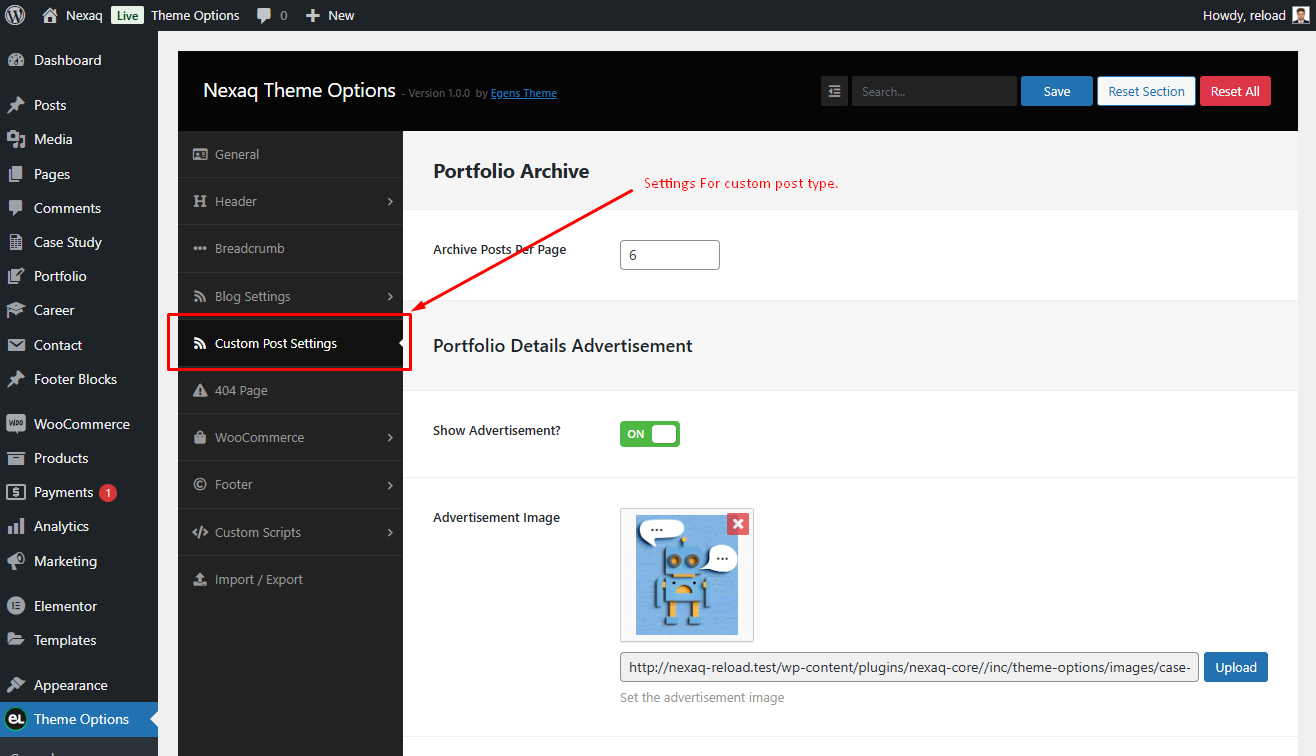
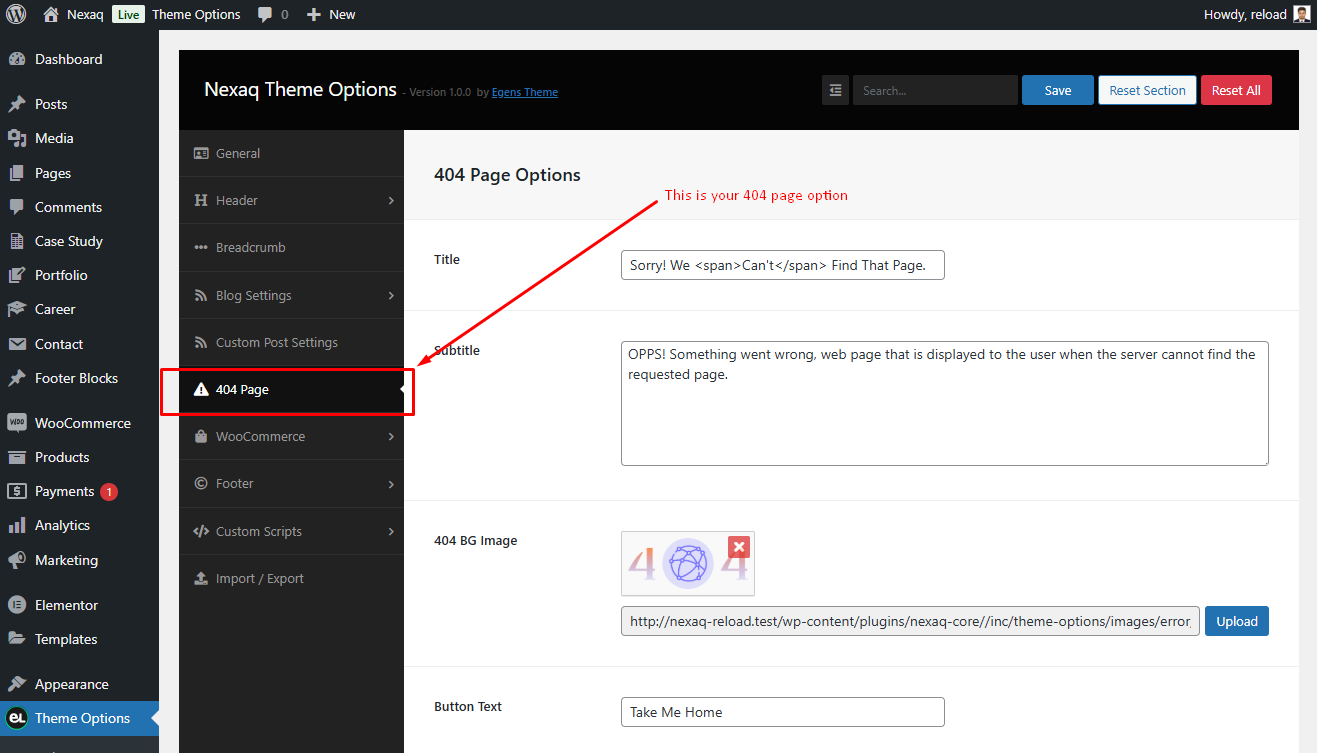
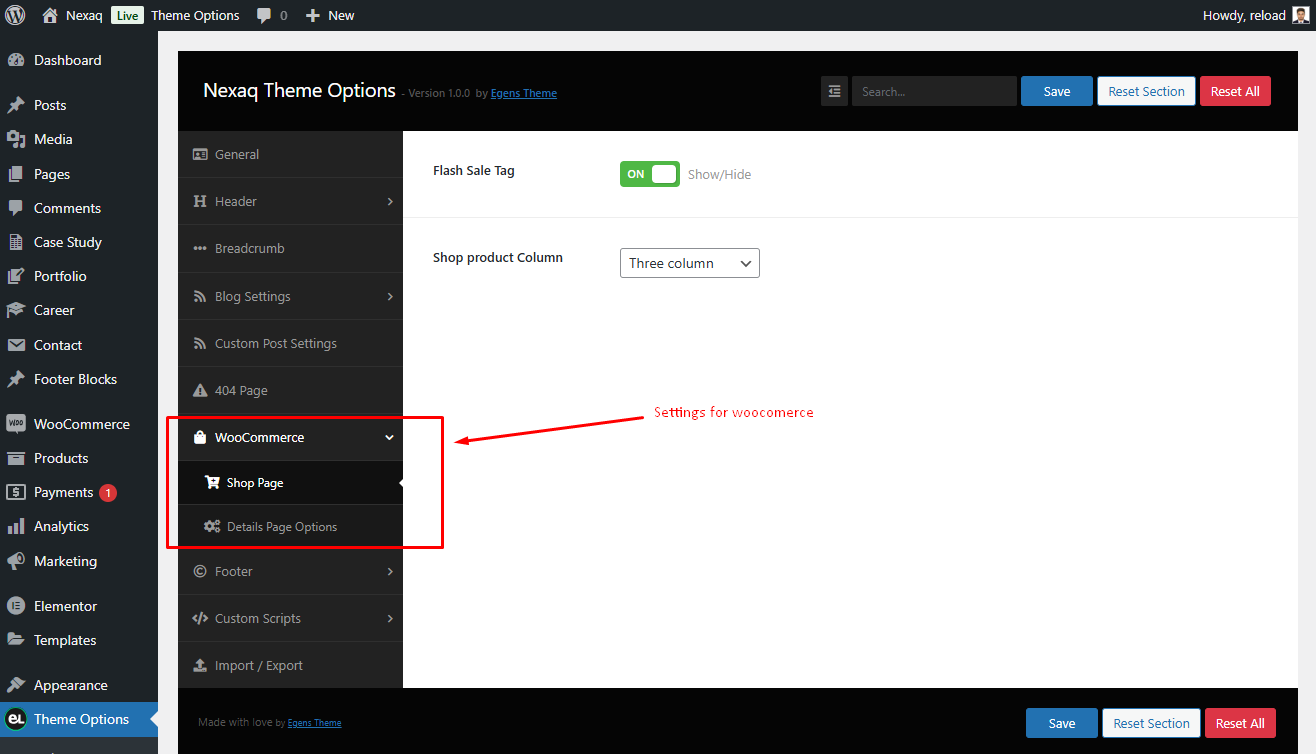
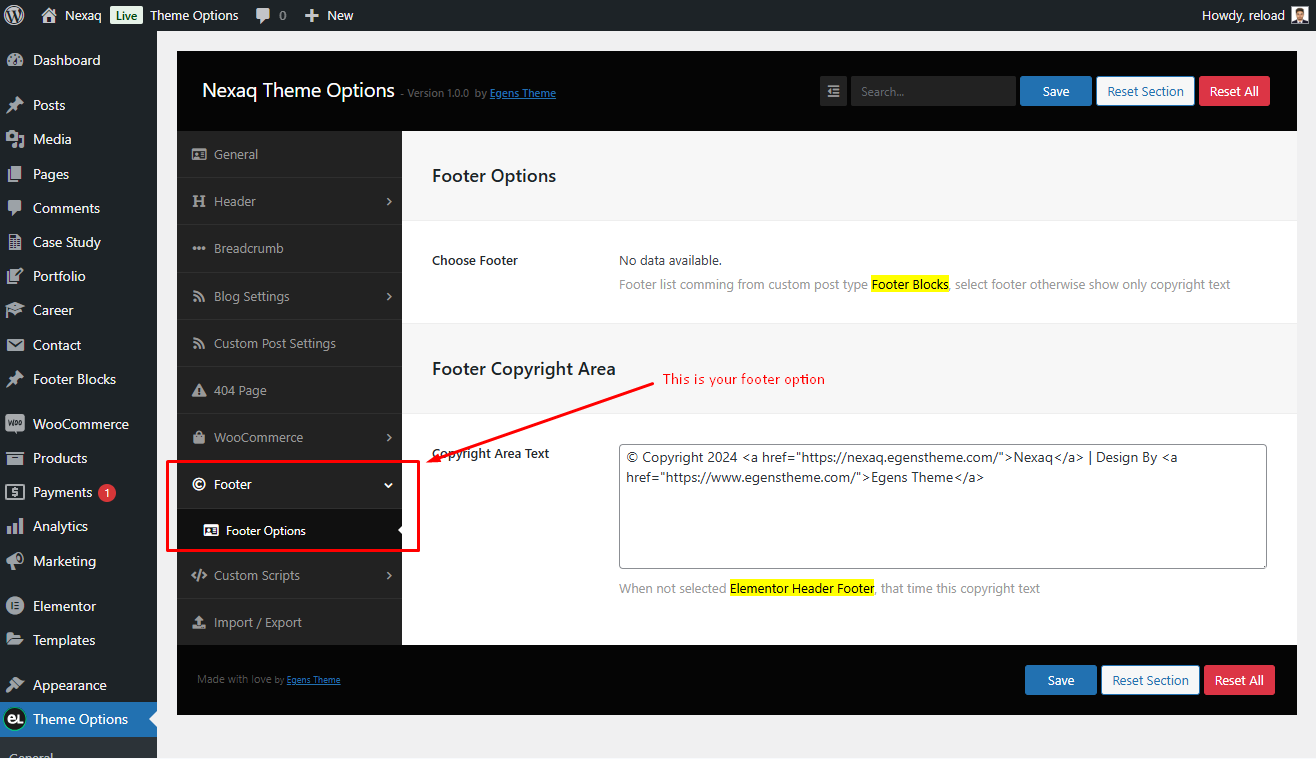
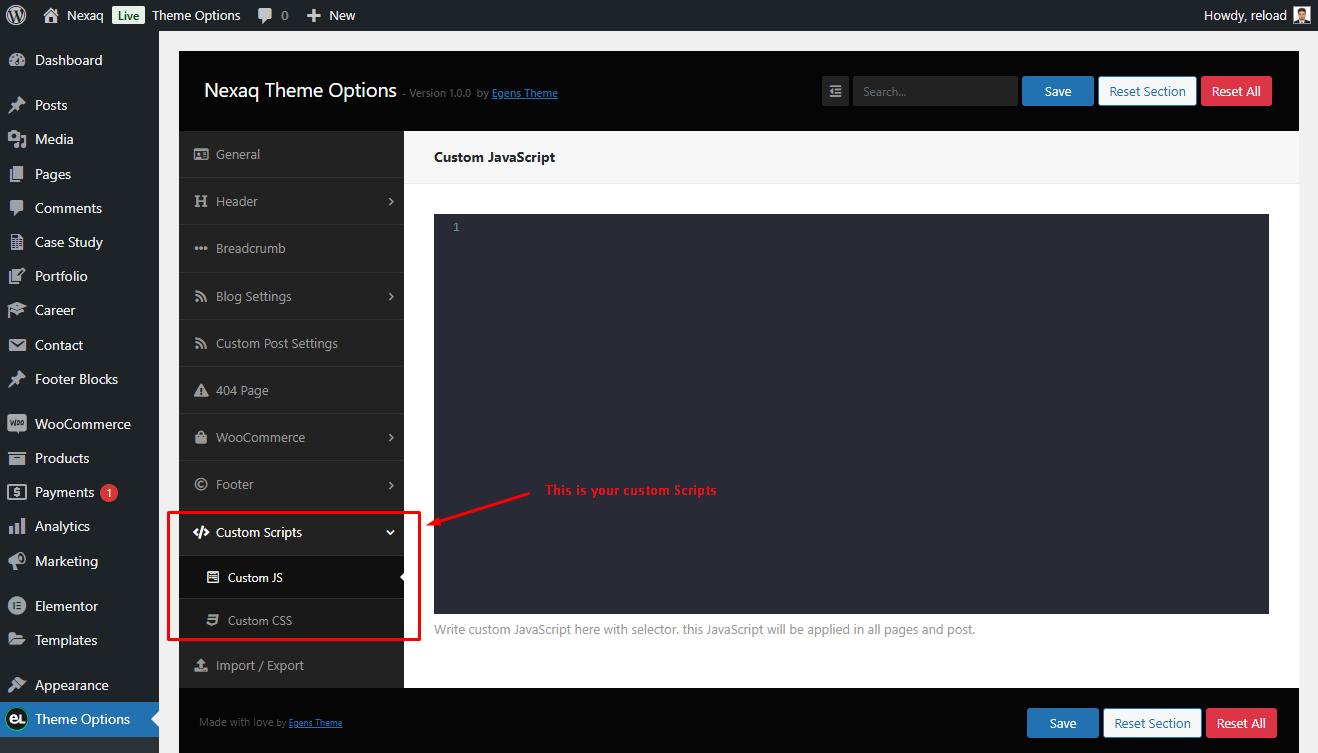
Theme Options Panel
Follow these screenshot to change your theme layout from Theme Options
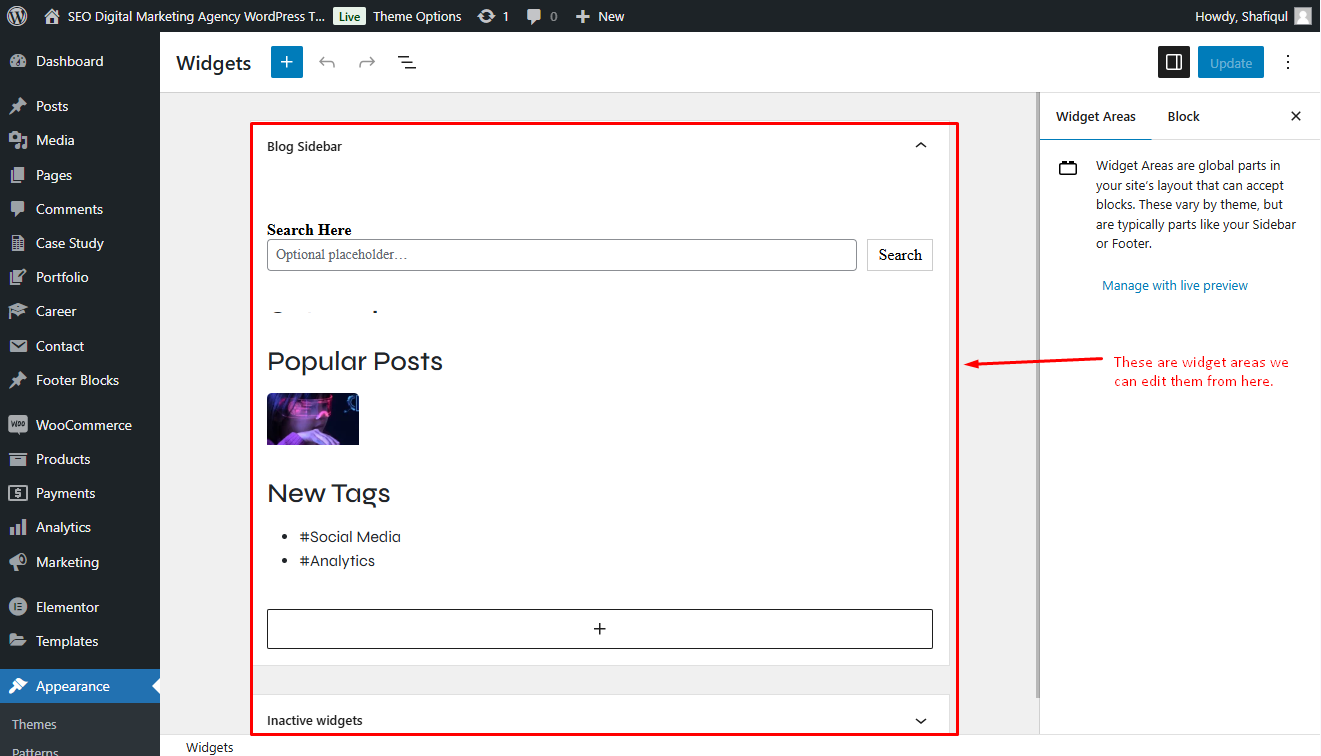
How to add widgets
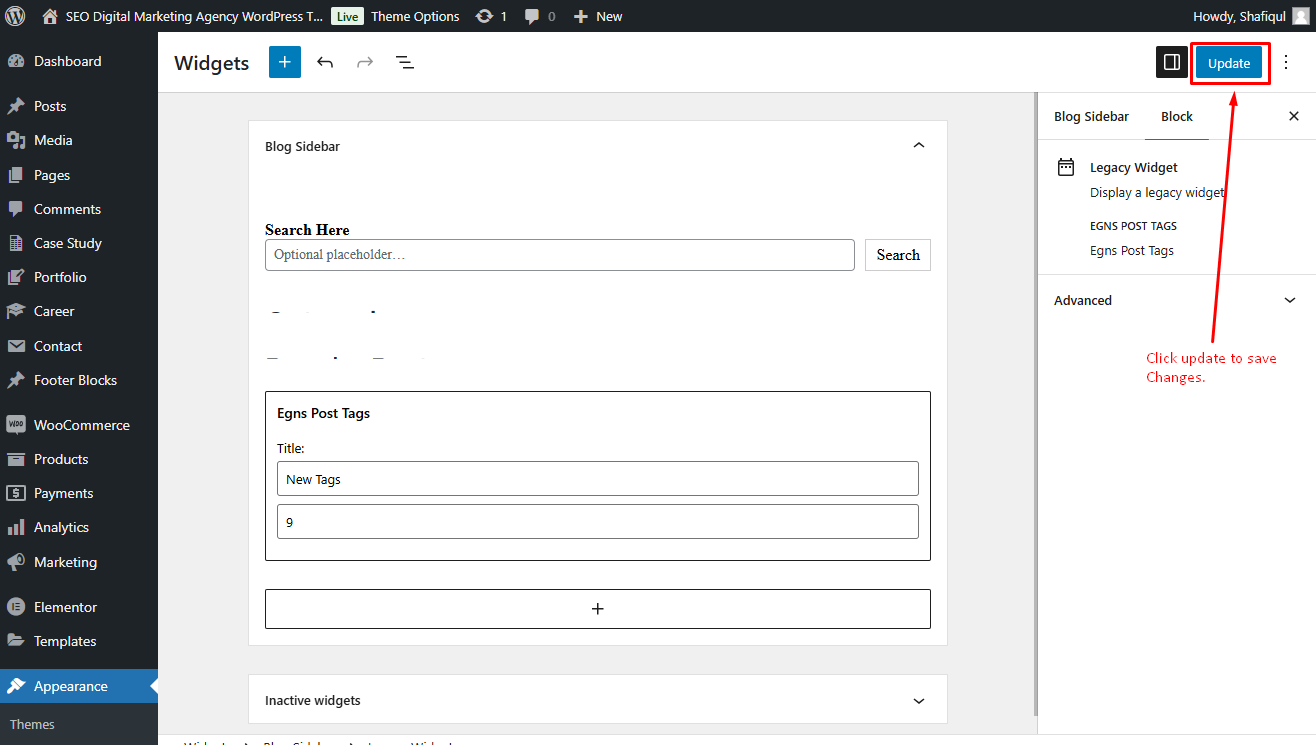
Step 1: Navigate Appearance > Widgets.
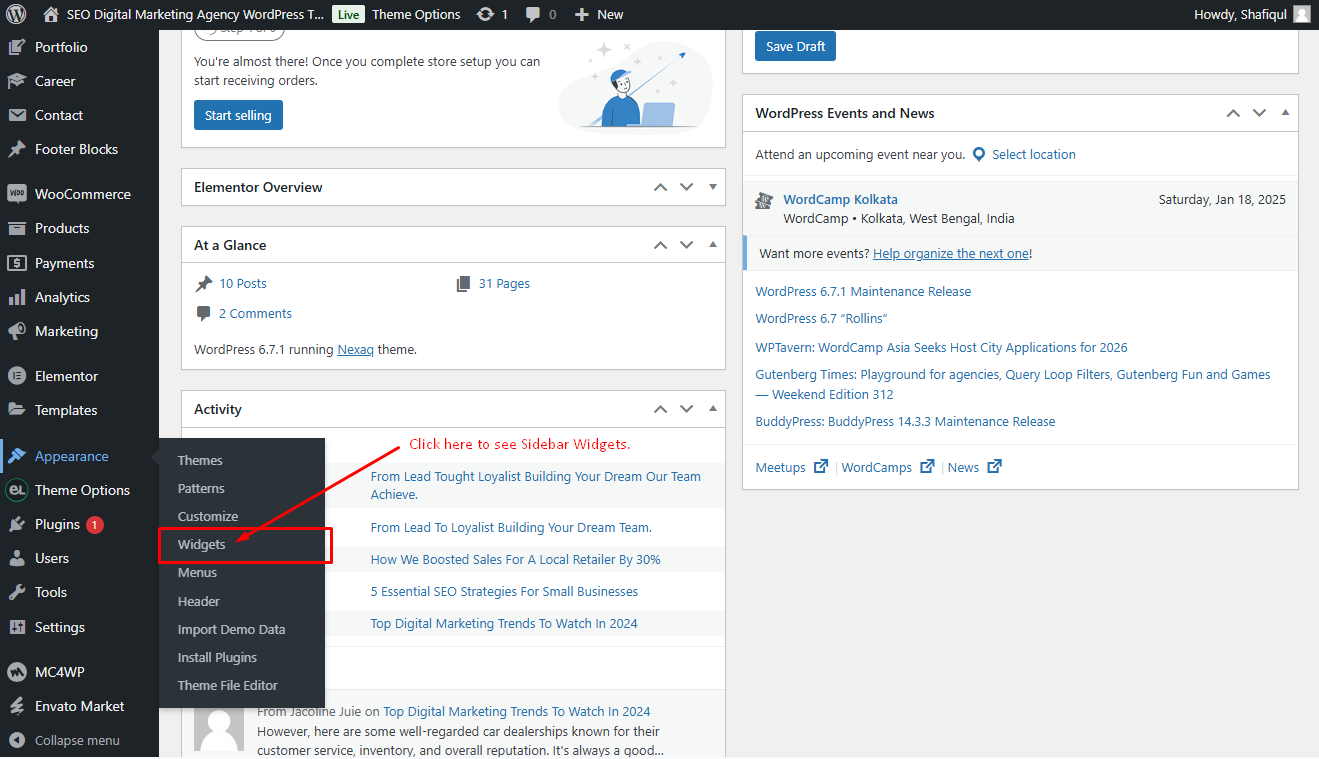
Step 2: You can see all the widget areas here.
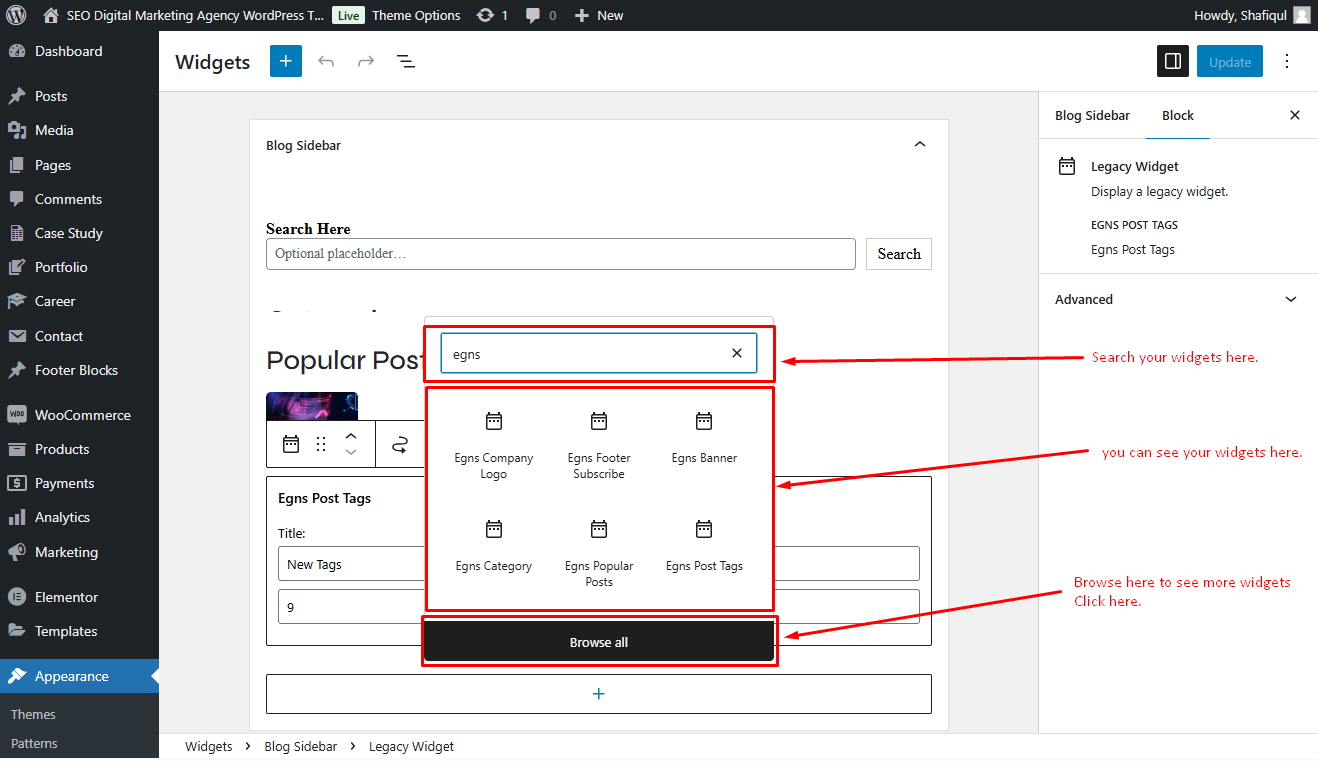
How to edit a widget
Step 3: Click on Plus icon and search theme name to see all custom widget.
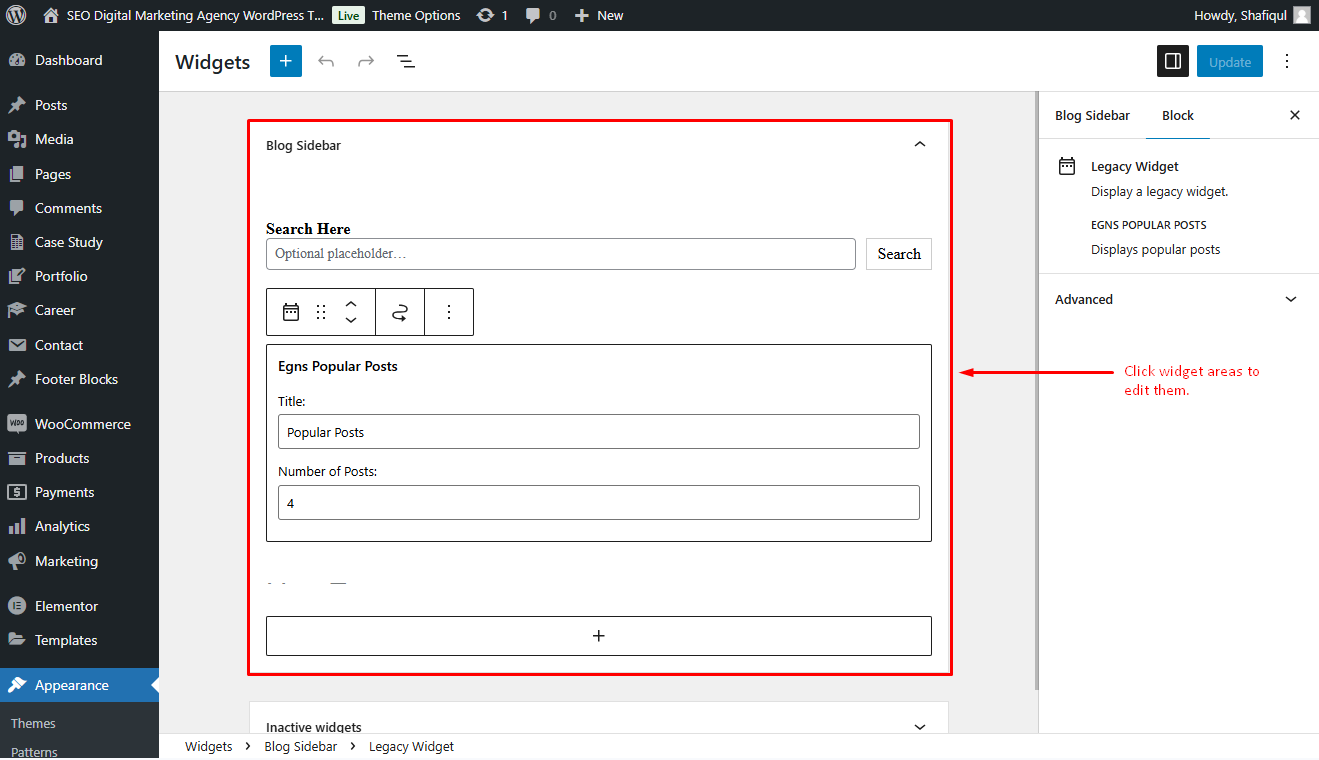
Step 4: Click on widget to edit them.
Step 5: When you click on widget an edit form will appear.
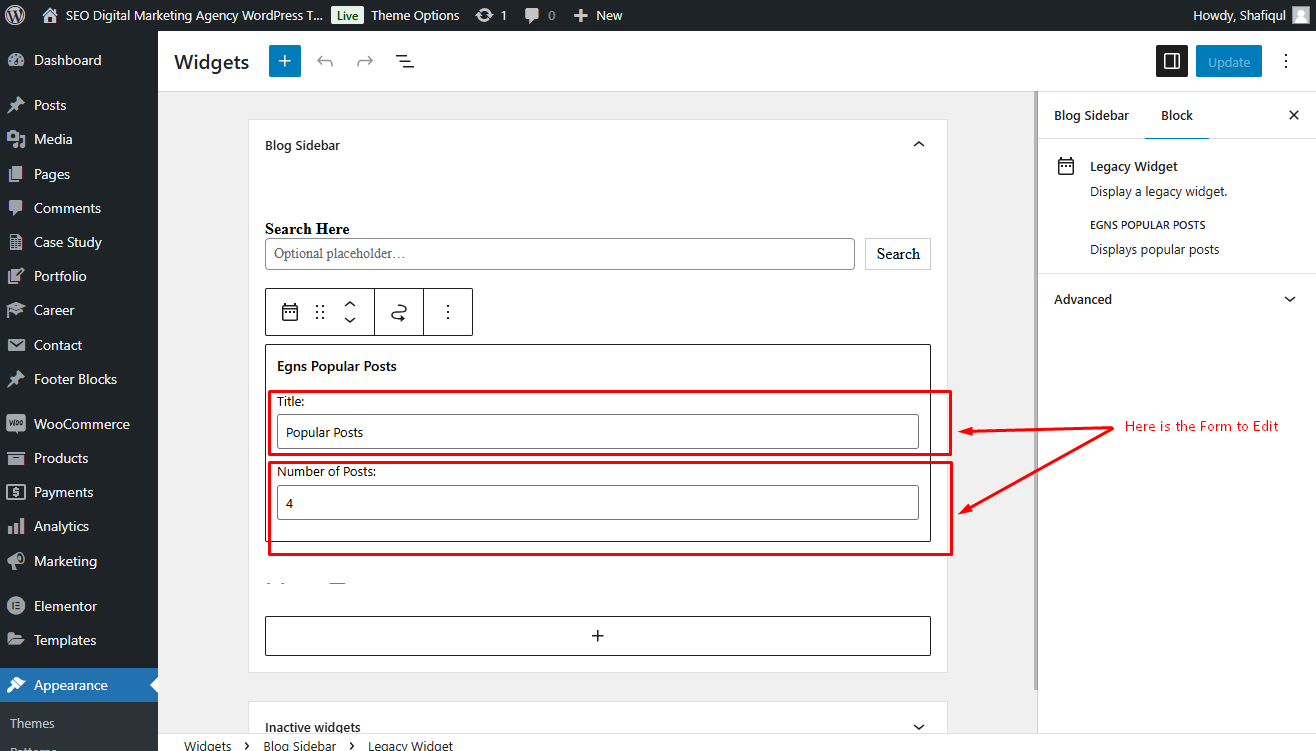
Step 6: After editing, click Update to save changes.
Theme Update Tutorial
There are two ways to update the theme. The regular and the automatic way.
Automatic
This is the easiest way to update a theme. You can do that by Envato Market Plugin. We already included this plugin with our theme. You need to install and activate the plugin and configure it with your themeforest profile. For configuring this plugin follow this tutorial article: http://www.wpexplorer.com/envato-market-plugin-guide/.
Manual
Go to your "Themeforest Download Account" and download the latest package. Unzip it and overwrite the theme folder on your server via a FTP Client.
Plugins
If the theme uses plugins and there are updates available for theme, you should see a notification and be able to easily install theme.However if you don't see the notification bar, you can update the plugins manually as well.
Plugins
Following list of packages will be included:
- Elementor Page Builder
- Egens Core
- Contact Form 7
- MC4WP: Mailchimp for WordPress
- One Click Demo Import
- SVG Support
Home Page Demos






Source & Credits
Images:
- Unsplash - https://unsplash.com/
Icons:
- Icons Font Face - https://icons.getbootstrap.com
- Icons Font Face - https://boxicons.com
Scripts:
- jQuery - http://www.jquery.com/
- Bootstrap 5 - http://getbootstrap.com/
- swiperjs - https://swiperjs.com/get-started
- Magnific Popup - https://dimsemenov.com/plugins/magnific-popup
Support
If this documentation doesn't answer your questions, So, Please send us Email via Item Support Page
We are located in GMT +5:30 time zone and we answer all questions within 12-24 hours in weekdays. In some rare cases the waiting time can be to 48 hours. (except holiday seasons which might take longer).
Don’t forget to Rate this template
Go to your Themeforest Profile > Downloads Tab > & then You can Rate & Review for our template.
Thank You.
More Templates
Checkout Our Premium Templates Below